[Werbung | Ad]
Guten Morgen ihr Lieben!
Heute habe ich einen etwas längeren Blogpost vorbereitet.
Der Anlass ist das brandneue Scoring Board & Trimmer von Sizzix, das heute am 1. September offiziell erscheint. Ich habe es auf Herz und Nieren geprüft und verschiedene Funktionen ausprobiert.
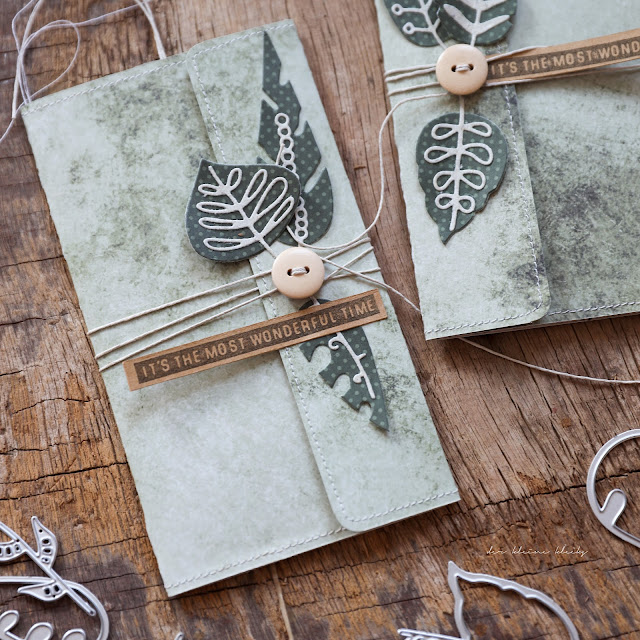
Dabei rausgekommen u.a. meine heutigen Umschläge mit Steckfächern.
Und jetzt seht selbst!
Das sind die Ergebnisse:
***
Good morning to you all!
Today I have prepared a slightly longer blog post.
The occasion is the brand new Scoring Board & Trimmer from Sizzix, which is officially released today, September 1. I have put it through its paces and tried out various functions.
Out came, among other things, my today's envelopes with pockets.
And now have a look for yourself!
Here are the results:
Zwei Umschläge mit Blättern und Holzknöpfen, mit Fächern für Etiketten, Geschenkkarten oder einfach kleinen Kärtchen. Da könnt ihr eurer Fantasie freien Lauf lassen.
***
Two envelopes with leaves and wooden buttons, with compartments for handmade tags, gift cards or simply small cards. There you can give free rein to your imagination.
Und so sieht das neue Schneide- und Falzbrett aus:
***
And this is what the new cutting and folding board looks like:
Für die Umschläge habe ich einen 12x12" Bogen Designpapier in zwei Hälften geteilt und 3x gefalzt, so dass 4 Abschnitte entstehen. Die Ecken der Papiere habe ich gleich mit dem mitgelieferten Eckenabrunder bearbeitet. Den könnt ihr ganz bequem aus der Halterung oben rausnehmen.
***
For the envelopes, I divided a 12x12" sheet of design paper in half and folded it 3x to make 4 sections.
I cut the corners of the papers with the supplied corner scraper. You can easily take it out of the holder at the top.
Die Maße sind bei den beiden Umschlägen etwas unterschiedlich, die könnt ihr natürlich ganz individuell gestalten. Wichtig ist, dass der Teil innen, wo das Einsteckfach entstehen soll, minimal schmaler ist als der Abschnitt daneben, und der darauffolgende nochmal ein kleines Stück breiter als der zweite. Dann lässt sich der Umschlag gut verschließen. Der 4. und letzte Teil, die Lasche, braucht nicht mehr so breit sein.
Auf den folgenden Bildern könnt ihr hoffentlich erkennen, was ich meine.
***
The dimensions are slightly different for the two envelopes, which you can of course design individually. It is important that the part inside, where the pocket is to be created, is minimally narrower than the section next to it, and the following again a little bit wider than the second. Then the envelope can be closed easily. The 4th and last part, the flap, does not need to be as wide.
Hopefully you can see what I mean in the following pictures.
Vielleicht ist euch aufgefallen, dass ich die Seite mit dem Einsteckfach einmal rechts, und das andere mal links angeordnet habe, und auch auf verschiedenen Höhen. Da seid ihr ganz flexibel. ;)
***
Perhaps you have noticed that I have arranged the side with the pocket once at the right, and the other time at the left side - and also at different heights. You are totally flexible. ;)
Das Einsteckfach habe ich mit einem Winkel von 30° geschnitten, das hat mir persönlich optisch am besten gefallen. Dazu kann man das türkise Lineal einfach in den entsprechenden Winkel bringen, das Papier anlegen und dann den Schnitt ausführen.
***
I cut the pocket with an angle of 30 °, which I personally liked most. To do this, you can simply bring the turquoise ruler to the appropriate angle, put the paper next to the ruler and then make the cut.
Nur zu Dekoriationszwecken habe ich die gesamten Papiere einmal mit der Nähmaschine abgesteppt.
***
Just for decoration purposes, I stitched the entire papers once with the sewing machine.
Und jetzt müsst ihr für den Knopf noch die Mitte der kleinen Lasche markieren. Hierfür kann man gleich die (nur auf den Fotos nicht erkennbaren) Maßangaben (in weiß) neben der Schnittlinie oder natürlich das normale Lineal hernehmen. Der aufgenähte Knopf wird dann zum Verschluss des Umschlags. Ein Fadenende habe ich so lang gelassen, dass ich den Faden 3x um den Umschlag und noch ein kleines bisschen um den Knopf wickeln kann. Das andere Ende habe ich relativ knapp abgeschnitten.
***
And now you need to mark the center of the small flap for the button. For this you can take the white measurements next to the cutting line or of course the normal ruler. The button becomes the closure of the envelope. I left one end of the thread long enough to wrap it 3 times around the envelope and a little bit around the button. The other end I cut relatively close to the knot.
Die Umschläge habe noch mit den neuen Artsy Leaves Stanzen von Tim Holtz und einem Stempel aus dem Set Seasonal Vibes #1 von Pete Hughes dekoriert.
***
I decorated the envelopes with the new Artsy Leaves cutting dies by Tim Holtz and a stamp from the Seasonal Vibes #1 set by Pete Hughes.
Jetzt kommen noch die Anhänger in das Einsteckfach.
Die Anhänger habe ich ebenfalls mit dem Brett zugeschnitten, die Ecken mit 45°.
***
Finally I put the tags into the insertion compartment of the envelopes.
I also cut the pendants with the board, the corners with 45°.
Ich wünsche euch viel Freude beim Nachbasteln und Experimentieren, da gibt es ganz bestimmt noch viele andere Möglichkeiten, wie man solche Umschläge gestalten kann!
***
Have a lot of fun with crafting and experimenting, there are a lot of other ways for sure how you can create such envelopes!
Herzliche Grüße und vielen Dank fürs Vorbeischauen!
***
Best regards and thank you for stopping by!
Julia
Material:
6665797 Sizzix Making Tool - Scoring Board & Trimmer
666380 Artsy Leaves - Tim Holtz - Sizzix
666318 Seasonal Vibes #1 - Pete Hughes - Sizzix


